Friday, September 18, 2009

Smartsurfaces day 2. Lots o' Arduino!

Just got back from day 2 of Smart Surfaces (it's a weekly, all day Friday course). It was a fun day, quite interesting and all new for me. We worked with Arduino over the course of the week on our own and then today learned some slightly more advanced things.

We started with LDR cells (photoresistor cells).

LDR lessons here.

The arduino and breadboard for the LDR circuit.

We then moved on to H-bridges. An H-bridge is an electronic circuit which enables a voltage to be applied across a load in either direction. These circuits allow DC motors to run both forwards and backwards. H-bridges are generally used to reverse the polarity of a motor, but can also be used to 'brake' the motor, where the motor comes to a sudden stop.
HBridge lessons here.

The h-bridge set up.

Finally we moved onto servo motors.
Servo lessons here.
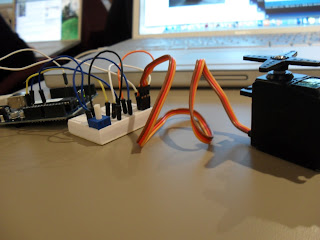
The servo motor set up.

All this learning was set up towards our exercise for the day, making photoresistor cells follow a light source. Our team used the photo cells, and the servo motors to accomplish this goal. We didn't really use the h-bridge because we only had an hour to accomplish the whole thing. I don't have any picture even because we were working so diligently. Our homework this week though is to get back together and perfect our designs so I'll have pictures once were done with that. This class is so interesting and actually quite fun!

Last week I had commented on the different knowledge basis that the different students had and today it was apparent again. One of the engineering students (whose name now escapes me, sorry!), knew what to do with the coding side and really was the director for our team today on the electronic side of things. I helped to put together some circuits and build the base that our servo motors moved on and the housing for our photo cells to thus follow light from. It was fun!

I'll have more later, once we meet again.

Just a point, for anyone remotely interested in this or any interdisciplinary work on design, engineering, check out the Smart Surfaces website. It's so much more than a simple course site.

Thanks for reading!

My workspace for the day. Glamourous, I know.

Arduino and making LED's blink! It's all so exciting!

Well, we've learned basic Arduino. Made a LED light up and blink! We used these lessons, here, if anyone is interested and we had the basic Arduino starter kit.

An Arduino board.

And then we had some fun with the RGB LED's. Video is below. I'll post more about my thoughts on this later. In the mean time, I'm getting some sleep!


Final hook ups.

Thanks for reading!

Wednesday, September 16, 2009

Day 1 of Smart Surfaces.

Well, this is going to be a really interesting course.

I won't go into every detail but, like I had thought, it was interesting working with students from other disciplines. Well, actually, the architects in the course had methodologies pretty similar to the designers. A very hands on, try it and make prototypes, it's ok to fail while you work out the final design kind of thinking. It was cool to see and it makes total sense that both the architecture school and the art & design school share a building. The engineering prof, Max Shtein, made an interesting point about the disparity of knowledges that the different disciplines had, say he started talking about 1, 2 and 3 point perspective, only 2/3rds of the class (designers and architects)would really understand what he was talking about. But if he asked us to differentiate some equation, probably only 1/3rd (engineers) would know what to do. ( Wonder if can do that anymore, doubt it).

On an unrelated note, go to Professor Shtein's page (link on his name) and check out his picture, looks like a high school yearbook photo. Love it.

We had a mini one day exercise where we were split into teams (2 engineers, 2 designers, and 2 architects)and we had to move sand from location to location (using gravity) leaving a certain amount of sand at each location. It was actually quite fun, and used materials that we creative types are quite familiar with, cardboard and duct tape primarily. The sand started up high and worked it's way down to the different locations. We were judged on things like efficency, durability and spectacle. We went big on the spectacle part. We made a sling shot to shoot the sand up to a funnel that divided the sand out and moved it through tunnels to the different locations. It was awesome. So much potential for failure, but so cool.


Testing the angle sand would slide down cardboard at.

Matt and I were responsible for the slingshot, we tested the tension needed to throw a cup full of sand 4 feet. Answer, quite a bit.

Building the sand holders, like 5 minutes before we presented. It was tight, but worked!

So our design worked, but we were penalized for having to much human interaction. Basically we ran out of time to build a support structure for our funnel and tunnels and had to hold it up ourselves. Out of the 4 teams, ours was actually the only one that really worked and successfully got the sand to each location. I think that was because, besides the slingshot, we actually kept our design simple. Since we were working with cardboard, we kept the whole thing simple with minimal moving parts and thus, once the sand was in the funnel there was less of a chance for cascading failure. You know, once we got past the whole flinging sand thing.

We are now moving on to Arduino, a computer processing language I think. I've had no experience with this at all and I'm a bit nervous/excited. We have to make LED's light up for homework. Here we go!

Thanks for reading!

Welcome to Smart Surfaces! Now, what is it?

Smartsurfaces offers a collaborative, project-based learning experience in which artists, designers, architects and engineers come together to build physical systems and structural surfaces that have the capability to adapt to information and environmental conditions. The course operates as a multidisciplinary, hands-on think-tank where participants pool their knowledge and skill sets to work together to produce environmentally sound and socially responsible projects. Public exhibition of these funded projects provides an opportunity for participants to present their work to a wider audience and to review their achievements. Projects make use of the resources available to all participating university units, such as: parametric modeling, digital fabrication, networked sensors, micro-controller programming, and energy harvesting using solar cells and nano-structured materials. This course is a collaborative endeavor led by three professors who will advise and contribute to all team projects. Teams will make use of visiting lecturers, specialists, site visits, and relevant stakeholder organizations. (From U of M Art & Design Fall 2009 elective courses)

I'm extremely proud to be in this course and I'm excited to be working with students from other disciplines. It will be quite interesting to work with engineers again specifically, I spent 3 years working on a B.S. in mechanical engineering here at Michigan before I realized that I absolutely hated engineering and was miserable. I then transferred over to Michigan art & Design to study product design. I realize now that I really disliked the engineering way of thinking about anything. A formulaic, only one answer way of thinking. Now this is perfect (and needed) on say, making sure a building stays up, or a plane doesn't fall apart. It just wasn't for me. Either way, it will be interesting collaborating with the other students.

Tuesday, September 15, 2009

Paper Shoes

We've started out in More w/ Less making paper shoes that support our own weight. Well paper sandals really. It's all really a prototyping exercise for making real shoes out of recycled materials. I concentrated on making mine out of similar strips of material, partially out of a desire to give myself some constraints and partially out of a desire to be able to mass produce the building blocks of my design! On all of the shoes I concentrated on the structural design of the soles supporting the three main pressure areas from human feet. Our heels (a big point pressure), the ball of your foot, and the big toe (which is used a pushing off point in our strides). I tried to concentrate material around these areas.

I'll show my favorite and strongest of my three shoes first. I built them using 12"x1" strips of sketch book paper and rolling them in to small, medium and large cylinders and gluing the individual cylinders together. It created a very strong and robust platform which was still flexible for the foot to move with. I was very happy with the sole of these shoes and my class and professor seemed to appreciate them as well for their aesthetic value (no one else had anything like mine) and strength.


The second set of shoes, a material heavy explosion of zig zaged bristol board cut into 12"x1/2" strips. They were ok on strength ( the sides were prone to buckling if you stood off center) and just looked cluttered.

The third set of sandals were a direct response to the second pair, where I used lots of material on both of the other sets, I wanted to use less material here. These are 12"x1/2" bristol board strips, folded into layered triangles. I was pretty happy, with these, except for the heel. In a late night and I was tired oversight, the triangles of the heel extend out from under the sole piece and really break up the familiar lines of the shoe. It really hurts the design. I shouldn't have been doing these at the late hour I was though.


The big problem with my sandals was that again because it was late and I was tired, I didn't think of how to attach the straps for your feel to the soles until after the soles were finished. It produced much less than stellar results. I'm not even going to show the pictures. Jan was instructing me to really spend some time looking at my cylinder design and figuring out where to take if from here specifically pertaining to large cylinder, small cylinder layout and integrating straps.

It's interesting to look at the issue with the straps and how I got sucked into viewing only the soles as the major issue to design around in paper shoes and apply that to my design process as a whole. I think I'm really missing a step where partially through each step (say, sketching, sketch models, prototyping etc) I take a step back and see where I'm headed and try to identify problem areas. I'll be working on improving on that this semester.

Thanks for reading!
Related Posts with Thumbnails