Showing posts with label magnets. Show all posts

Thursday, April 15, 2010

She comes in colors ev'rywhere!

Just got my metal pieces back from powder coating, they look very nice. I'm quite happy I decided to spend the money on having them professionally painted. I picked a cobalt blue and a semi-gloss white and stuck with the matte black on the third piece.


The cobalt blue with an unfinished wood piece hung on it. The magnets go in the holes and it will then be covered in a birch veneer and shellacked. Besides finishing the wood pieces up, I'm working on making some custom mounting pieces out of aluminum stock and hanger screws so that the Home Base sits flush with the wall. Trip to the hardware store and Alro metals for parts to fabricate the fasteners out of and then I'll be ready to glue the metal to the wood! Busy few days ahead!

Thanks for reading.

Friday, April 2, 2010

Home Base Sketch Model

Well, it's final project time in Architecture of Objects. We were supposed to do a furniture piece, but I really felt interested in a wall storage product and Shaun let me explore it.

So, I'm working on a storage solution for keys and mail. The product will go beside the front door and would magnetically hold keys on it's front and hold the mail in a curve created by the supporting metal structure. It's sort of a J, placed on the wall.

Below is a sketch model, affixed to my fridge because I didn't want to nail the sketch model to my wall. The keys pull the cardboard down a bit, so the front is not vertical like the final metal model will be.


The cardboard here is going to be powder-coated steel and the foam core will be routed out fin-ply covered in a birch veneer and stained with a light shellack.

The curve in the metal provides a nice 8" x 5" x 2" slot for storing mail, and is deep and wide enough to support magazines, newspapers and small packages. Above the mail slot there is a large 10" tall by 7" wide metal area perfect for notes and reminders held by small magnets. The smooth Birch front is the perfect place to store your house keys with the embedded bank of neodymium super magnets holding them securely with out the tangle of hooks. Simply hold your keys up to the wood and let go, the magnets will do the rest.

I've gone through a few different names for my product, I feel that this is really one of the first products I've worked on that needs a name that describes what it does. My possible list includes,

Home Organizer (all ready used)
Key Base
Wall Organizer
Key Home
Wall Store (all ready used)
Home Base
Home Store
Wall Base
Store
Home Store

Right now Home Base is the front runner. I was thinking the packaging could read,

HOME BASE
Your Families Mail, Key and Message Board Base

Or something like that. It needs work.

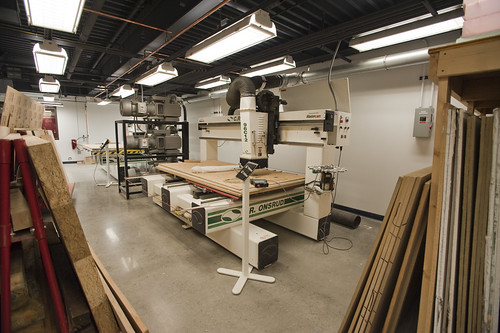
I'm starting routing right now, initial routing tests were mildly successful. I've made the product as a whole 1" wider, providing more room on the metal for messages and more room on the wood for keys. It also provides a wider place for the mail to sit so that it dosen't easily fall out if it's not centered in the slot.

Routing the rough pass.

Routing the finish pass.

After the finish pass. I'll take this to the table saw and cut off the excess stock.

So that's were I am currently, on Thursday I'll be spending the afternoon routing out the new wider pieces. In the mean time, cutting out the metal and bending it. Then it needs to be taken to the powder-coater for finishing. Step by step.
I'm making multiples (I'm thinking 3) since they are quite simple and with a smaller object multiples really read nicely.

Thanks for reading.

Sunday, October 25, 2009

Magnetic Chair (in process)


My magnetic chair is coming along full swing. I've had some hiccups of course, like the bending plywood not bending nearly as tightly as I was lead to believe it would and instead snapping. But over all, I'm ok with the bending ply not working, it was really not a very nice material to look at when layered and the whole reason I wanted to use layered veneers was for the edge quality of layered veneers.

Instead I am CNC machining the legs (well, the entire chair) out of a nice plywood from Fingerlee Lumber here in Ann Arbor (a great local lumberyard, highly recommended). I've got time on the CNC machine tomorrow morning and I'm quite excited, it will be my first time on these machines. I'm so thankful that Michigan has the world class Taubman Architecture college in the same building at the Art & Design school. Because of their huge budget and big money donors (namely the schools name sake, Taubman), they have an impressive amount of tech that I'm able to get my hands on. I love it and kinda wish the Architecture school had a design program as well. Design in the hands of artists is withering out sadly.


The CNC routers. Photo from Julian Bleecker's Flickr.

The other snafu was the magnets I had ordered online turned out to be from a company in Hong Kong. In my haste to order them at the end of a class period, I neglected to check where they were shipping from. So for the chair that I wanted to keep the sourcing local, I end up buying product from Hong Kong. The stupid things aren't even here yet. I ended up buying some neodymium magnets from Stadium Hardware here in Ann Arbor, again highly recommended.

I've worked out where all the magnets lay and will be embedded and I am quite happy with how it should come all together. Below are some screen shots from Rhino of my model and cut files. (I decided not to take the time now and render them nicely, so screen shots it is for now!)

The cut file. I'm cutting 3/4" plywood and sandwiching the pieces to create the size needed. The circles are various drill holes for the friction and magnetic held wooden rods that will hold the chair together while in its 'up' position or the magnet holes for the carrying 'down' mode.

The chair up on the left and the collapsed carrying state on the right. The hole in the back of the seat acts as a handle for carrying the chair.


Another view.

I'll post some process pictures of the CNC and the resulting pieces tomorrow. Thanks for reading!

Tuesday, October 13, 2009

The Bending Ply Has Landed!

So, as I start to type this, I've realized I have not posted a thing about Making Furniture! So, here we go then!

The class started with lots of tutorials on how to use wood chisels, make traditional joints, make models and cut stuff with japanese saws. After this requisite training part, we're getting to have some fun. We're working on our first projects now, which oddly are our midterms projects.

We are making stools or tables that fit in a 18" x 18" box. It's interesting to see all the different ways classmates are taking, but I'm working on creating a collapsable chair held together by friction fits and magnets. Below is my cardboard sketch model of the chair when in its up configuration.
The back will be only 4 inches tall, really more of a way to keep you from sliding off the back. The legs and back all remove and then snap together and to the seat base by embeded magnets. The seat and back are going to be made from some super nice plywood with the magnets embeded through CNC machining of space for them. I am embedding some aluminum stock with drilled with holes in the seat and back for a metal accent. The top and bottom of both the seat back and seat bottom will be covered with a light colored Maple veneer.

The legs will be made from bending plywood and covered with the same light colored Maple veneer.

The aluminum stock.

The maple veneer.

My sheet of bending ply!
Related Posts with Thumbnails