Saturday, December 18, 2010

EcoPaw Show Materials

Thought I'd upload our EcoPaw team posters from the IPD trade show. These were printed 3'x4' and looked great!

We didn't win unfoutunately, came in mid pack. While we won the web show nicely, we were in 5th during the trade show in terms of market share at 10.4% (the 2nd - 5th were all with in 1% of each other). We also overstocked by quite a large amount and that hurt our bottom line, but in the end I'm really proud of EcoPaw.


Thanks for reading!

Trailer Design Moving Forward

So this last Wednesday I presented what I've done this semester for my thesis project to a panel of 3 professors, 2 of which were new to my project. I'm glad to say it went quite well.

They liked the direction and my project narrative (my target consumer is right below), and suggested to help me differentiate myself from other more bike centric trailers on the market to really heighten in my promotional materials and in presentation the walking cart aspect of my trailer. Perhaps adding a second person to my narrative, a Charlene to my Charlie (I'm thinking Charlie's wife, she doesn't bike but likes to walk to the store.)


This past week I really moved the trailer design forward. I had made a rough frame out of pvc pipe, but it was really premature to start building, all it really did was confuse the issue when I was still not even close to sure of a final form to test. I omitted the physical models from the presentation and stuck with sketches.

What I really moved forward on was getting away from the Travoy idea which has really held me back and thinking about the trailer and bag as one neatly integrated instead of two separated entities. So I put away the old sketches and ideas and just started to sketch more organic forms of a bag and trailer together.

The bag clips over a frame which gives it form and rigidity. The red levers are at fold points. The vertical wings which give depth to the bag fold flat and the wheels would detach to fit in the back of a closet or behind a door.
The walking configuration. The castor walking wheel folds down and locks into position. At the top there is the push/pull handle.
The riding configuration, the castor wheel folds up and out of the way while the trailer hitch arm fold ups to the seat post and attaches there. The actual hitch mechanism is unresolved at this point but I know it will need a full range of motion to let the two wheels of the trailer stay in contact with the ground when turning. I've also realized that the castor wheel support structure will need some covering or sealing as during riding the bike wheel will spray water and debris all over it. One other note, the trailer is not quite to scale of the bicycle, its drawn way to big here. Think 1/4 smaller.
The bag will be two compartments, a smaller top compartment for small or fragile items (phone, wallet, keys, laptop). I see this having fold up dividers for item need customization. The larger lower compartment would be for large or bulky items, such as full grocery bags. Ideally, the two compartments will be combinable for extra large items (think large dog food bags).

And moving forward,
Thought are always welcome! Thanks for reading!


Tuesday, December 7, 2010

Trailer Design Iterations

It's nice to now think only about bike trailers and not pooper scoopers, but anyway...

So, after totally being called on just emulating (a nice way to say, knocked off) the Burley Travoy, I'm back to the drawing board on the frame design. I'm still aiming for the same set of parameters for the trailer when I initially set out on this project,
  • walkable and bikeable
  • lightweight
  • stable w/ load (riding or walking)
  • customizable bag options

So initial ideas all followed the Travoy model of flat bed, foldable, support structure around the bed. I played with ideas for adding a third wheel for walking as I perceived the Travoy to be a bit tippy when standing upright (especially when loaded) as it stood on two wheels and a small leg. My goal was when walking to have at least 3 wheels on the ground for stability.


My methodology for joining the metal tubes (plastic housings basically) also was derived from the Travoy. In my trailers new form, I'll mostly likely use a similar joint as this seems to be the best and most elegant method. Also, this drawing came out well.


In sketching for the new frame I decided to work off of a single main tube as the backbone of the trailer with the main support wheels moving in towards the frame for riding and out to create a tripod with a castored wheel for walking. Walking stability was a high point with this iteration.


A guide slid up and down the main tube, keeping the wheels lined up.


The sliding guide however took up quite a bit of space on the tube that could other wise be used for mounting a frame for cargo. Thus only the top and bottom of the tube could be used for mounting, with a aimed cargo weight of 60 lbs, this would create quite a bit of stress and would need large amounts of reinforcement at the junctures adding complexity and weight.


To combat the sliding ring, a grooved guide was added to the side of the main tube, keeping the wheel struts in alignment and clearing room for more cargo supports. The raising and lowering of the legs would be accomplished by a lever on the top of the main tube connecting via cables and pulleys inside the tube to the wheel struts. Pull the cable up and it would pull the wheels in to the frame for riding. An issue with this was locking the wheels in place and the extra complexity of the pulleys and guide wheels. The more moving parts mean the more to go wrong. I realized I was moving away from Dieter Rams 10 principles, and was making the trailer more and more complex. The more complex, the greater the possibly of a mechanical failure.


So, in this vein of simplicity with stability, I'm working on elimination of as many moving parts as possible. Goodbye cables and pulleys.

This is the latest scanned sketch I have (I know, its super rough), moving the two main support wheels to be stationary (to eliminate as much stress on a joint as possible) and moving the castored wheel to the fold down third wheel. This is the direction I'm currently moving the trailer in, presently in Rhino, with the aim to be making a physical model out of pvc pipe starting the 8th.

Thanks for reading.

Thursday, November 18, 2010

EcoPaw : What's your carbon pawprint?

Oh yes, IPD (the competitive team design class) is in full swing. It's all due Monday afternoon. Luckily my team has worked together amazingly well and we are almost done. I just finished our 3rd prototype, which is pictured here in all it's green glory, and have a few alterations to make to our final product. Minor things though, not drastic redesigns. We are losing the rubber pinch points (the bag holders) as the bag stays put without them and they are costly to manufacture. Also the way the cordura fabric attaches to the body is being redesigned to keep the shoulder strap out of the way when scooping. Now all I need to do is make 3 more for Monday!

We had our final design crit yesterday with the professors and it went very well. Shaun Jackson and Bill Lovejoy called our teams design "sophisticated" "sleek" "cool" "hip" "urbane" and "possible winner". Oh yes.

Oh, the name, Ecopaw, is because the body is made out of recycled polystyrene and all the bits are recycleable.

Ecopaw comes with biodegradable bags and biodegradable poop stoppers (they are made from chipboard).

When done, toss the biodegradable poop stopper into the bag and it all will compost.

In this generation, the fabric cover pulls around back and is held magnetically.

The fabric cover pulled over the mouth of Ecopaw, again held magnetically in place on the back side.


The back side of Ecopaw, where the removable shoulder straps connect to the body.

Snap button closures on the front side as well.

4 finger rubberized handle for good grip in cold and warm weather.

The maligned Pinch Points, they don't work consistently and aren't really needed. They were also a pain to make. Although, Shaun Jackson (my thesis prof) was impressed at how resolved they were!

Looking down the mouth of EcoPaw. You can see the magnets on the bas and the inside of the snap closures.


Ecopaw in it's carry state. As the shoulder strap is removable, if the user wishes they could carry Ecopaw by hand.

So, seeing as how this is a design competition I was holding off posting until late in the game. If the other teams haven't figured out their design by now, well, I doubt they could successfully knock off my design in a weekend. I'm feeling pretty good about this all right now obviously.

Thanks for reading!

Thursday, October 28, 2010

Detroit Connections Photos

Originally this was just supposed to be only two or three photos from Detroit Connections, but in going through my photos I found it hard to chose only a few (I've taken about 350 photos so far and the kids are so great!).

For those of you who don't know, Detroit Connections is a class where one day a week we spend the day at a Detroit Public school (ours is Garvey Elementary) teaching 5th graders art. Detroit schools have basically no money so all extra (ie, non testing subjects) have been eliminated. We are art facilitators more than anything, not really teaching processes but introducing materials to explore. It's a great experience every time and I really enjoy spending time with the kids and getting to know them.


My fellow group leader, Jenn with (R to L) Kortnee, Cierra and a girl who is best friends with Cierra but I can't remember her name as she's not in our group.

Making wood sculptures, the three girls in our group decided to team up and make a neighborhood.

Andre, showing me his sketch book cover. Heck of a kid, loves super heros and calls me Peter Parker (as I always have my camera and my name).

Melanie (our prof) and Gerrard discussing ideas.

Kortnee and Day'Jaire showing me their panted hands.

Andre created something he was excited about!


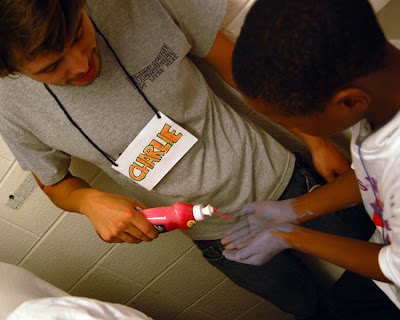
Our GSI, Charlie, helping clean the kids up after paint mixing.


Thanks for reading!

Thursday, October 14, 2010

Initial Bag Sketches

Well, I've been working on thesis, and I thought I'd share a few sketches and other things from my work so far.

I'm designing a bicycle trailer for urban based commuters for anyone who doesn't know. I've been sketching and surveying users (thanks to all who have given me responses!). Below are a few bag sketches. The bags will attach to a blank trailer and will accept up to several bags at once (one bag dosen't fill the entire thing). There will be three bag sizes, small, medium, large and each size will be customized for certain types of objects or tasks. For example, the small bags would be placed so they are easily reached and hold small, more valuable objects (wallets, keys, phone, iPod, babies). So far, I've just worked on the outer forms of the bags and haven't delved into the interiors yet.
A few small, upper bag ideas are what I present here.


This bag is more in the vein of the large bag, designed as a large cargo volume bag for carrying groceries for example. Basically anything big goes in here.

A few sketches on the over all form, these sketches in particular are only with two bags. The trailer would accept up to three small bags is my thinking for now.


I've also been learning to TIG weld aluminum this week. It aint easy. I've never welded before, so we decided to start with the hard stuff so that when I back track and learn to weld steel it will be a piece of cake for prototyping early forms.


One of the better beads I laid on the Al. Practice, practice, practice.


Thanks for reading!
Related Posts with Thumbnails