Sunday, October 25, 2009

Week 4 and the Light Box in Smart Surfaces

Well, it's done.

Pretty much, we created a light box that is motion activated when someone walks by. Our group envisioned this project as an installation piece where there would be large scale deployment of these cubes in a large public area (like U of M's Diag). As people move between the cubes in their daily lives the light would follow them through the cubes. Yep, we made an art piece that makes the sun an ancillary part, it's got solar panels on top to charge it during the day.

This was a trying project, and I'm honestly very glad we are done with it. Our team didn't always work well together and I even made the front page of the Smart Surfaces website ranting about it last post. Opps/Nice.

We had Julian Bleecker from the Near Future Laboratory come this week and talk to us about Undisciplinaryism. He commented on each of our projects, but unfortunately seemed to have little to say about our groups projects.
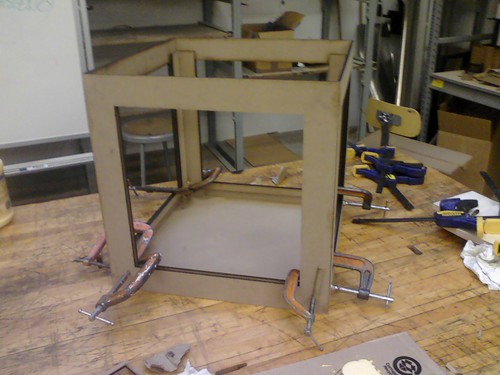
Building the box.


Setting up the wires.


The windows are acyclic that slide down into slots in the box and are then lit by a row of colored LED's from the bottom. Patterns were laser scored into the panes to provide opportunities to light to catch.
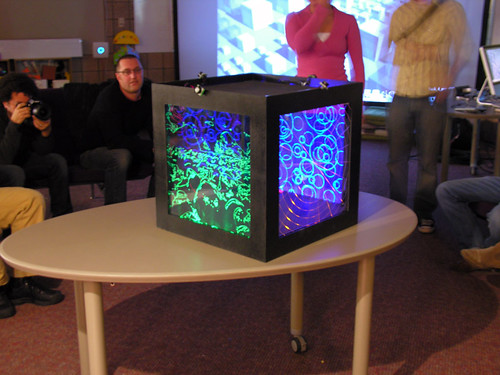
(From rootoftwo (John Marhall) on Flickr)

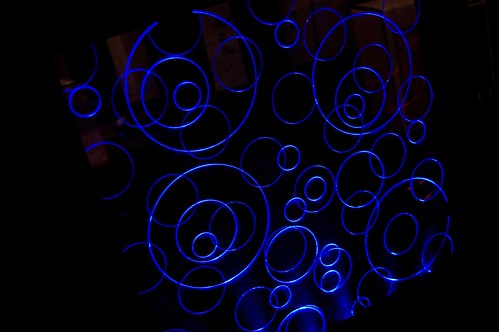
The blue LED's worked very well, and it made the bubbles pane of acrylic look great.

We're onto our final groups and final projects now. I like my group, everyone seems good so far! We presented ideas for our projects today in class and it seemed from all the presentations that the professors (John Marshall, Max Shtein, Karl Daubman) were not extremely excited or happy with our ideas. I'm tempted to ask what they were really hoping for or thinking we might come up. They honestly seemed disappointed. We'll see.

Thanks for reading!

Magnetic Chair (in process)


My magnetic chair is coming along full swing. I've had some hiccups of course, like the bending plywood not bending nearly as tightly as I was lead to believe it would and instead snapping. But over all, I'm ok with the bending ply not working, it was really not a very nice material to look at when layered and the whole reason I wanted to use layered veneers was for the edge quality of layered veneers.

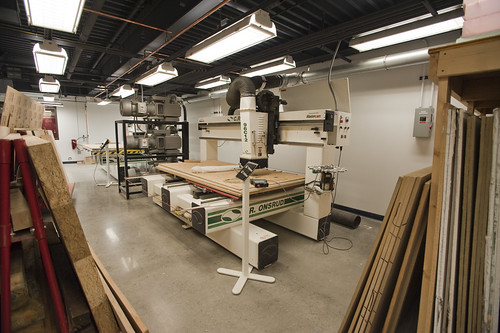
Instead I am CNC machining the legs (well, the entire chair) out of a nice plywood from Fingerlee Lumber here in Ann Arbor (a great local lumberyard, highly recommended). I've got time on the CNC machine tomorrow morning and I'm quite excited, it will be my first time on these machines. I'm so thankful that Michigan has the world class Taubman Architecture college in the same building at the Art & Design school. Because of their huge budget and big money donors (namely the schools name sake, Taubman), they have an impressive amount of tech that I'm able to get my hands on. I love it and kinda wish the Architecture school had a design program as well. Design in the hands of artists is withering out sadly.


The CNC routers. Photo from Julian Bleecker's Flickr.

The other snafu was the magnets I had ordered online turned out to be from a company in Hong Kong. In my haste to order them at the end of a class period, I neglected to check where they were shipping from. So for the chair that I wanted to keep the sourcing local, I end up buying product from Hong Kong. The stupid things aren't even here yet. I ended up buying some neodymium magnets from Stadium Hardware here in Ann Arbor, again highly recommended.

I've worked out where all the magnets lay and will be embedded and I am quite happy with how it should come all together. Below are some screen shots from Rhino of my model and cut files. (I decided not to take the time now and render them nicely, so screen shots it is for now!)

The cut file. I'm cutting 3/4" plywood and sandwiching the pieces to create the size needed. The circles are various drill holes for the friction and magnetic held wooden rods that will hold the chair together while in its 'up' position or the magnet holes for the carrying 'down' mode.

The chair up on the left and the collapsed carrying state on the right. The hole in the back of the seat acts as a handle for carrying the chair.


Another view.

I'll post some process pictures of the CNC and the resulting pieces tomorrow. Thanks for reading!

Tuesday, October 13, 2009

The Bending Ply Has Landed!

So, as I start to type this, I've realized I have not posted a thing about Making Furniture! So, here we go then!

The class started with lots of tutorials on how to use wood chisels, make traditional joints, make models and cut stuff with japanese saws. After this requisite training part, we're getting to have some fun. We're working on our first projects now, which oddly are our midterms projects.

We are making stools or tables that fit in a 18" x 18" box. It's interesting to see all the different ways classmates are taking, but I'm working on creating a collapsable chair held together by friction fits and magnets. Below is my cardboard sketch model of the chair when in its up configuration.
The back will be only 4 inches tall, really more of a way to keep you from sliding off the back. The legs and back all remove and then snap together and to the seat base by embeded magnets. The seat and back are going to be made from some super nice plywood with the magnets embeded through CNC machining of space for them. I am embedding some aluminum stock with drilled with holes in the seat and back for a metal accent. The top and bottom of both the seat back and seat bottom will be covered with a light colored Maple veneer.

The legs will be made from bending plywood and covered with the same light colored Maple veneer.

The aluminum stock.

The maple veneer.

My sheet of bending ply!

Installation Project

So, we're almost done with project 4. We've had two weeks on this project and it's is incredibly open ended, well kinda. The project is,

This exercise prompts you to propose, develop, deconstruct and implement an idea based on the principles of an interactive, heliotropic smartsurface. The smartsurface concept should constitute a set of functionalities that otherwise exist in 3-dimensional space, collapsed into an ostensibly 2-dimensional space, thereby gaining additional functionality and/or appeal.

The example in class of a ostensibly 2-d surface that is really 3-d was the iPhone. Lots of different layers go into the screen of that device, but they are squished together to create what it for most intents, 2-d.

Well, our group, and and other groups I believe, have taken this project and pretty much run with it. Our group is making an installation piece. Basically, there are a field of human size cubes in an open area. The cubes are lined with acrylic and LED's that are turned on by a heat sensitive motion sensor. As you move by the LEDs light up and fade as you move away. As you move through the field the trail of light follows you. The interaction with the lights changes as other people move through the field with you.

So basically, we stuffed the iPhone and made an art piece. Sweet!

I'm sorry, I don't have a single picture to share currently, my little point and shoot camera has basically gone from being on the fritz to officially freaking out and not working. Since I don't carry my big DSLR around with me, I don't have any pictures...yet.

So stay tuned! Pictures to follow!

In all honesty, it's been a very frustrating and trying one and a half weeks with the current group and I'll be happy to be done with this project, we don't seem to work extremely well together and we have some stubborn group members and we have been butting heads. It's been interesting.

Thanks for reading!

Extension Cord Lamp

Just wanted to show this, I found it on Core 77 and loved it! I wish I had thought of this!


Wednesday, October 7, 2009

Bendable LEDs Looking For an Application? Now This Sounds Like A Problem For Smart Surfaces!


"LED manufacturer Bivar's new, flexible Light Pipe System, a bendable LED tube ideal "for outdoor and rugged applications, which require greater brightness and light transfer capacity, sturdy design and more flexibility."

Hmm. I like this. I wonder if my group can get our hands on some for our project...

Wednesday, September 30, 2009

Even More Heliotropic Systems!

So this week was a bit different in Smart Surfaces as we spent last Friday in class learning Digital Project, a software program that is a pain to work with but kinda cool when it does work.
Sitting in class, making Theo Jansen walking leg machines in Digital Project. Note, watch the Theo Jansen TED talk I linked just above. It's amazing.

Our objective this week,

You are to make a heliotropic field that is responsive to the movement of the sun. Use this project to build on previous work and to refine your understanding of a heliotropic system. Is it possible that the shadow of one cell might affect its neighbor? Is it possible for cells work together to share the available sunlight? The power copy demonstration developed a simple form and framework that uses information from the solar chart. Working with your team, you are to develop a speculative design in Digital Project and a prototype array built with your Arduino materials.

This should be presented as:
  • An animation using screen shots from Digital Project.
  • An operational prototype of 3 working / related cells.
Obviously the digital representation can include a larger field of components and demonstrate their relationships while the Arduino mock-up will demonstrate the operation of a few cells.

So, with that in mind, this is what we're working on. A field of cells that follow the sun using data on where the sun is from Excel and Digital Project. We're also designing something akin to flower petals that open as the day starts to collect sun and close in the evening.


Initial Ideas and Drawings

Assembly of our field.


The field, these are pulled by two servos to follow the sun.

Assembly of the servo connections.

Our field, moving, controlled by the Arduino.

Cutting out the petals for the collectors on the laser cutter.

Our group is meeting again tonight for final set up to get everything working. I'll be taking pictures and posting soon!
Thanks for reading!

Arduino Heliotropic Code

This is the code from our second project, the light source finder. Our code was mostly derived from the Arduino meets Processing project and was pretty much figured out by Michael Mathieu, a senior in MSE.

Just a note for anyone who's never looked at code before, anything inside of or after / is a comment to tell the human reader what it does.

/*
* ap_LDRAiming
*
* Reads an analog input from the input pin and sends the value
* followed by a line break over the serial port.
*
* This file is part of the Arduino meets Processing Project:
* For more information visit http://www.arduino.cc.
*
* copyleft 2005 by Melvin Ochsmann for Malm� University
*
*/
#include
Servo myServo;

// variables for input pin and control LED
int PhotoA = 3;
int PhotoB = 4;
int PhotoC = 5;
int LEDpin = 13;
int pos = 0;

// variable to store the value
int valueA = 0;
int valueB = 0;
int valueC = 0;
// a threshold to decide when the LED turns on
int threshold = 750;
void setup(){

// declaration of pin modes
pinMode(PhotoA, INPUT);
pinMode(PhotoB, INPUT);
pinMode(PhotoC, INPUT);
pinMode(LEDpin, OUTPUT);
myServo.attach(9);
// begin sending over serial port
Serial.begin(9600);
}

void loop(){
// read the value on analog input
valueA = analogRead(PhotoA);
valueB = analogRead(PhotoB);
valueC = analogRead(PhotoC);

// if value greater than threshold turn on LED
if (valueA <>

// print out value over the serial port
Serial.print(valueA);
Serial.print(",");
Serial.print(valueB);
Serial.print(",");
Serial.print(valueC);
// and a signal that serves as seperator between two values
Serial.print(";");
// Checks if right is greater than left, if so move to right.

if (valueB > (valueC +20))
// +20 is the deadzone, so it wont jiggle back and forth.
{
if (179 > pos)
pos++;
myServo.write(pos);
}

// Checks if left is greater than right, if so move to left.
if (valueC > (valueB +20))
// +20 is the deadzone, so it wont jiggle back and forth.
{
if (pos > 1)
pos -= 1;
myServo.write(pos);
}

// wait for a bit to not overload the port
delay(10);
}

The code includes a serial input that we used to judge whether or not our solar detection was working properly in a numerical sense. By slowing the program down to a delay of 250, we were able to tweak the code in order to ensure that the readings were proper, and that we could utilize the changes in direction properly.

The biggest issue for our group was ambient lighting, which we were able to counteract with a shade of sorts Allison and I made while in design, but in final display we could not, because of the amount of ambient light in the presentation area rendered our shade useless. We set our thresholds slightly too high for the situation that we were in, but it worked amicably for the purpose of presentation.

Thanks for reading.

Smart Surfaces and Heliotropic Systems

A quick update on week 2-3. We've moved along with arduino learning how to program it using photocells and servo motors to follow a light source, which is quite cool actually, I'm still at the "gee-whiz! It moves!" stage of physical computing. I really think they should teach physical computing in Physics 240 (electromagnetic physics and includes circuits) and Engin 101 (programing). Learning how to manipulate code to actually have a physical result is much more engaging than the same old compile, run, debug, compile, run, "hello world!'.

Anyway, all of this is leading into heliotropic systems (following the sun, like sunflowers).

Our light source tracker!

The bread board and all the wires inside the base.

We had two servo motors moving our contraption. One on the horizontal (x-axis) making it rotate and follow side to side and the other on the vertical (y-axis) following up and down.

For a quick video of it mostly working (too much ambient light, we set our light threshold a bit to high). Check out my group member, Damien's, flickr site here. Her blog can be found here.

Friday, September 18, 2009

Smartsurfaces day 2. Lots o' Arduino!

Just got back from day 2 of Smart Surfaces (it's a weekly, all day Friday course). It was a fun day, quite interesting and all new for me. We worked with Arduino over the course of the week on our own and then today learned some slightly more advanced things.

We started with LDR cells (photoresistor cells).

LDR lessons here.

The arduino and breadboard for the LDR circuit.

We then moved on to H-bridges. An H-bridge is an electronic circuit which enables a voltage to be applied across a load in either direction. These circuits allow DC motors to run both forwards and backwards. H-bridges are generally used to reverse the polarity of a motor, but can also be used to 'brake' the motor, where the motor comes to a sudden stop.
HBridge lessons here.

The h-bridge set up.

Finally we moved onto servo motors.
Servo lessons here.

The servo motor set up.

All this learning was set up towards our exercise for the day, making photoresistor cells follow a light source. Our team used the photo cells, and the servo motors to accomplish this goal. We didn't really use the h-bridge because we only had an hour to accomplish the whole thing. I don't have any picture even because we were working so diligently. Our homework this week though is to get back together and perfect our designs so I'll have pictures once were done with that. This class is so interesting and actually quite fun!

Last week I had commented on the different knowledge basis that the different students had and today it was apparent again. One of the engineering students (whose name now escapes me, sorry!), knew what to do with the coding side and really was the director for our team today on the electronic side of things. I helped to put together some circuits and build the base that our servo motors moved on and the housing for our photo cells to thus follow light from. It was fun!

I'll have more later, once we meet again.

Just a point, for anyone remotely interested in this or any interdisciplinary work on design, engineering, check out the Smart Surfaces website. It's so much more than a simple course site.

Thanks for reading!

My workspace for the day. Glamourous, I know.

Arduino and making LED's blink! It's all so exciting!

Well, we've learned basic Arduino. Made a LED light up and blink! We used these lessons, here, if anyone is interested and we had the basic Arduino starter kit.

An Arduino board.

And then we had some fun with the RGB LED's. Video is below. I'll post more about my thoughts on this later. In the mean time, I'm getting some sleep!


Final hook ups.

Thanks for reading!

Wednesday, September 16, 2009

Day 1 of Smart Surfaces.

Well, this is going to be a really interesting course.

I won't go into every detail but, like I had thought, it was interesting working with students from other disciplines. Well, actually, the architects in the course had methodologies pretty similar to the designers. A very hands on, try it and make prototypes, it's ok to fail while you work out the final design kind of thinking. It was cool to see and it makes total sense that both the architecture school and the art & design school share a building. The engineering prof, Max Shtein, made an interesting point about the disparity of knowledges that the different disciplines had, say he started talking about 1, 2 and 3 point perspective, only 2/3rds of the class (designers and architects)would really understand what he was talking about. But if he asked us to differentiate some equation, probably only 1/3rd (engineers) would know what to do. ( Wonder if can do that anymore, doubt it).

On an unrelated note, go to Professor Shtein's page (link on his name) and check out his picture, looks like a high school yearbook photo. Love it.

We had a mini one day exercise where we were split into teams (2 engineers, 2 designers, and 2 architects)and we had to move sand from location to location (using gravity) leaving a certain amount of sand at each location. It was actually quite fun, and used materials that we creative types are quite familiar with, cardboard and duct tape primarily. The sand started up high and worked it's way down to the different locations. We were judged on things like efficency, durability and spectacle. We went big on the spectacle part. We made a sling shot to shoot the sand up to a funnel that divided the sand out and moved it through tunnels to the different locations. It was awesome. So much potential for failure, but so cool.


Testing the angle sand would slide down cardboard at.

Matt and I were responsible for the slingshot, we tested the tension needed to throw a cup full of sand 4 feet. Answer, quite a bit.

Building the sand holders, like 5 minutes before we presented. It was tight, but worked!

So our design worked, but we were penalized for having to much human interaction. Basically we ran out of time to build a support structure for our funnel and tunnels and had to hold it up ourselves. Out of the 4 teams, ours was actually the only one that really worked and successfully got the sand to each location. I think that was because, besides the slingshot, we actually kept our design simple. Since we were working with cardboard, we kept the whole thing simple with minimal moving parts and thus, once the sand was in the funnel there was less of a chance for cascading failure. You know, once we got past the whole flinging sand thing.

We are now moving on to Arduino, a computer processing language I think. I've had no experience with this at all and I'm a bit nervous/excited. We have to make LED's light up for homework. Here we go!

Thanks for reading!

Welcome to Smart Surfaces! Now, what is it?

Smartsurfaces offers a collaborative, project-based learning experience in which artists, designers, architects and engineers come together to build physical systems and structural surfaces that have the capability to adapt to information and environmental conditions. The course operates as a multidisciplinary, hands-on think-tank where participants pool their knowledge and skill sets to work together to produce environmentally sound and socially responsible projects. Public exhibition of these funded projects provides an opportunity for participants to present their work to a wider audience and to review their achievements. Projects make use of the resources available to all participating university units, such as: parametric modeling, digital fabrication, networked sensors, micro-controller programming, and energy harvesting using solar cells and nano-structured materials. This course is a collaborative endeavor led by three professors who will advise and contribute to all team projects. Teams will make use of visiting lecturers, specialists, site visits, and relevant stakeholder organizations. (From U of M Art & Design Fall 2009 elective courses)

I'm extremely proud to be in this course and I'm excited to be working with students from other disciplines. It will be quite interesting to work with engineers again specifically, I spent 3 years working on a B.S. in mechanical engineering here at Michigan before I realized that I absolutely hated engineering and was miserable. I then transferred over to Michigan art & Design to study product design. I realize now that I really disliked the engineering way of thinking about anything. A formulaic, only one answer way of thinking. Now this is perfect (and needed) on say, making sure a building stays up, or a plane doesn't fall apart. It just wasn't for me. Either way, it will be interesting collaborating with the other students.

Tuesday, September 15, 2009

Paper Shoes

We've started out in More w/ Less making paper shoes that support our own weight. Well paper sandals really. It's all really a prototyping exercise for making real shoes out of recycled materials. I concentrated on making mine out of similar strips of material, partially out of a desire to give myself some constraints and partially out of a desire to be able to mass produce the building blocks of my design! On all of the shoes I concentrated on the structural design of the soles supporting the three main pressure areas from human feet. Our heels (a big point pressure), the ball of your foot, and the big toe (which is used a pushing off point in our strides). I tried to concentrate material around these areas.

I'll show my favorite and strongest of my three shoes first. I built them using 12"x1" strips of sketch book paper and rolling them in to small, medium and large cylinders and gluing the individual cylinders together. It created a very strong and robust platform which was still flexible for the foot to move with. I was very happy with the sole of these shoes and my class and professor seemed to appreciate them as well for their aesthetic value (no one else had anything like mine) and strength.


The second set of shoes, a material heavy explosion of zig zaged bristol board cut into 12"x1/2" strips. They were ok on strength ( the sides were prone to buckling if you stood off center) and just looked cluttered.

The third set of sandals were a direct response to the second pair, where I used lots of material on both of the other sets, I wanted to use less material here. These are 12"x1/2" bristol board strips, folded into layered triangles. I was pretty happy, with these, except for the heel. In a late night and I was tired oversight, the triangles of the heel extend out from under the sole piece and really break up the familiar lines of the shoe. It really hurts the design. I shouldn't have been doing these at the late hour I was though.


The big problem with my sandals was that again because it was late and I was tired, I didn't think of how to attach the straps for your feel to the soles until after the soles were finished. It produced much less than stellar results. I'm not even going to show the pictures. Jan was instructing me to really spend some time looking at my cylinder design and figuring out where to take if from here specifically pertaining to large cylinder, small cylinder layout and integrating straps.

It's interesting to look at the issue with the straps and how I got sucked into viewing only the soles as the major issue to design around in paper shoes and apply that to my design process as a whole. I think I'm really missing a step where partially through each step (say, sketching, sketch models, prototyping etc) I take a step back and see where I'm headed and try to identify problem areas. I'll be working on improving on that this semester.

Thanks for reading!

Tuesday, September 8, 2009

Back to school kiddies!

Ah, summer went so fast. It was busy, and I'll get you up to speed quickly.

Moved back to my parents house (Grand Rapids, Mi), got married (best part of summer), went to Cozumel, Mexico, moved to Ann Arbor with my new wife (Kara Mia!), worked full time at bike shop, started school today. It was a great, busy summer. I'm not sure if I want it to end!

But either way, it's back to school! Design!

I've had one class so far, More w/ Less. It's a sustainable design course with Jan Hendrick, one of my profs from last semester. I'm quite excited about it.

My courses are

More w/ Less Jan Hendrick-Anderson

This course focuses on developing a sustainable material future; how material use and form are integral to designing objects, and how to design with a keen eye on resources, energy and environmental impact. The visual/physical form language of sustainability is an important component. The focus is hands-on with direct approaches to reducing the carbon footprint of objects by way of planning, fabricating, testing and evaluating functional prototypes. This practical approach is supported by readings and course literature, discussions and demonstrations.


Smart Surfaces (I am super excited / nervous about this course) John Marshall

Smartsurfaces offers a collaborative, project-based learning experience in which artists, designers, architects and engineers come together to build physical systems and structural surfaces that have the capability to adapt to information and environmental conditions. The course operates as a multidisciplinary, hands-on think-tank where participants pool their knowledge and skill sets to work together to produce environmentally sound and socially responsible projects. Public exhibition of these funded projects provides an opportunity for participants to present their work to a wider audience and to review their achievements. Projects make use of the resources available to all participating university units, such as: parametric modeling, digital fabrication, networked sensors, micro-controller programming, and energy harvesting using solar cells and nano-structured materials. This course is a collaborative endeavor led by three professors who will advise and contribute to all team projects. Teams will make use of visiting lecturers, specialists, site visits, and relevant stakeholder organizations.


Making Furniture John Baird

Students carry on the tradition of propping up our skeletons by considering ergonomic, economic, esthetic and engineering aspects of making furniture -- as preparation to designing and building well-crafted chairs, tables, or other furnishings that entice the eye, tease the mind, and cradle the body. Students with skills in 3-D computer modeling may use 3-D models for visualization and for cutting out parts on a computer-controlled 4-axis mill. A refresher on joinery and characteristics of wood provided. Some "sketching" in 3-D materials to aid invention of furniture ideas used. The final project is one or more pieces of furniture that manifest a vigorous conceptual and formal synergy.


ADP 3 Tech/Environment Joe Trumpey
This is the last of the A(rt)D(esign)P(erspectives) courses that I'm required to take. I've heard good and bad about this course, it is either amazing, or a total waste of time. Tales of making friends with trees have reached my ears. We'll see.


Thanks for reading.

Monday, May 11, 2009

I didn't even know they gave A+ at Michigan.

Well all the grades are in. It was a hell of a semester. I am way better for it and much smarter than 5 months ago. I ended with a Pass, B-, B, B+, and the elusive A+. Heck yeah, Designer Bootcamp! Worked my butt off and it payed off big time.

I'm working at Terra Trike for a month and a half before the wedding June 19th. I'm really thankful to have the job with the way the economy is. I'm both glad and annoyed that I have 2 more years of school left. I've got 5 under my belt already thanks to the engineering to art/design transfer. I am so incredibly ready to be done with school, my younger sister even graduates this weekend. I am really happy for her and really wish I was graduating too. I've had my college experience, I don't care about parties and how much you drank last night one bit. It gets old sometimes having classes with people who were in middle school when I was graduating high school. Most people I have meet at Michigan A&D are great, mature, creative people who I'm very glad I know. But man oh man, there are some exceptions. Thanks to all the good ones.

On the other hand, I'm kinda glad I'm not graduating right now. The economy is in the toilet, it's trying to climb out, and is making progress, but it's certainly not in a good state right now. I'm glad that I don't have to start my career right now and have two more years of school for the economy to right itself. I have friends who graduated last year and this year who are still looking for jobs in their fields. I don't envy them right now.

Anyways, if I do anything A&D related over the summer, I'll post it. Such as, when I get a free moment (read after the wedding) I'll post pictures of the finished ABS plastic salt and pepper grinders. They are awesome.

Thanks for reading!

Thursday, April 30, 2009

The Semester From Hell

Well grades are rolling in one by one. So far I've got a B, a B+ and a Pass. I'm waiting for my last two classes. 

My sophomore review went pretty well, Ed West (a professor) only called me lazy 3 times, he has a bit of a rep for being a jerk and he lived up to it. I'll update on that when I get all my grades back and give a big semester run down. I'm so relieved to be done with that semester, it was really hell and shall from here on be referred to as the "Semester From Hell". Yep, crafted by the devil himself (OK, maybe not that bad, but I didn't sleep much that's for sure). 

On a good note, I'm done with the CFC series! They are a poorly conceived series of classes on Concept, Form and Context. Michigan could do so much with these classes, but really squanders the opportunity. Like so much at Michigan, your experience with a course is so heavily biased by which professor you get, each one runs what is supposed to be the same course, differently by section. It's really just luck if you get a good section. I got a good one for CFC 3, and that made the class better, but these classes  could be so much more! 

I am back home at my parents now (Grand Rapids, Mi) and working at Terra Trike again for a few months before the wedding on June 19th. It's really nice to be back, I can ride my bike, see my fiancee (the best part by far), and not constantly think about school. 

Thanks for reading!

Wednesday, April 22, 2009

Pooper Scooper Ideation

Last night I decided to change my pooper scooper idea for Designer Bootcamp, and that's after working out a different idea pretty well, but never being happy with it at all. It was best described as a collapsable hiking pole with a fish net on the end. It was for the elderly. It was boring, and unimaginative. 
So I changed my target consumer. Namely to one that could bend over easily. 

I'm working on a design that is A: inspired by existing designer home appliances and tools such as the Dirt Devil Kone, and B: takes it form language from the word 'scoop'. I'm aiming the product at young, urban 20 and 30 somethings who are living space challenged, style savvy, environmentally conscious dog lovers.

Just some ideation from last night.


Thanks for reading. I'll post how it turns out!
Related Posts with Thumbnails